

Notes on Syrup
Notes on Syrup
Plus! A honey-ginger scotch sour.
We’ve used a lot of syrups in this newsletter, and even devoted a couple of installments to creating specific syrups. But I’ve never outlined a broad theory of syrups in cocktails and how I think about both making and using them at home. So that’s what we’re going to do today. And then at the end, we’ll look at a modern classic that involves two different syrups, both of which will come in handy later for making other drinks.
Syrups are just sugar and liquid — most commonly water, but not always. The simplest of these is known as, er, simple syrup: It’s just an equal (1:1) parts combination of white table sugar and water, and you’ll see it listed in a lot of recipes for classic and contemporary cocktails.
Once you understand how simple syrup works, it’s pretty easy to extrapolate into other types of syrups: Change the ratio to 2:1 sugar:water, and you have rich simple syrup. Change the sugar from rich simple syrup to demerara sugar or cane syrup, and you have basic demerara syrup or cane syrup. Change the sweetener to honey and you have honey syrup. Infuse cinnamon or strawberries into your syrup, and you have cinnamon syrup or strawberry syrup — and so on and so forth. You can even change the liquid: Use pomegranate juice instead of water, for example, and you have grenadine.
The possibilities and combinations are endless, and if you eventually end up with an apple-rosemary-honey-spice syrup, you have at very worst done something interesting and had a useful learning experience. (If you make such a syrup — which to be clear I have never attempted myself — please let me know how it goes.)
What Syrups Do
Syrups have three primary functions in cocktails.
First, and most obviously, they sweeten the drink. Syrups are a way of introducing sugar (or another sweet substance) into your cocktail.
Second, they thicken the drink, changing the texture to make it more viscous. As I have occasionally noted before, bartenders sometimes refer to syrups as “fat,” because they change a drink’s mouthfeel, making it thicker and heavier — almost fatty. This may seem less obvious, but you should not underrate the value of texture/mouthfeel when making cocktails. The weight of it, the unique physicality of the liquid concoction, makes a huge difference in the perception and enjoyment of a drink, just as, say, the crispy skin on smoked pork shoulder or the buttery crispness of a lightly grilled hamburger bun can substantially shift the perception of pulled pork or a burger. Texture is incredibly important in cocktails, and home bartenders in particular often overlook it in favor of merely thinking about flavor.
But flavor is important too! Which brings us to…
Third, they provide the easiest and least expensive vehicle for adding novel flavors to cocktails, especially in a home environment. In the Irish Soda Bread Old Fashioned I wrote up earlier this year, for example, a key flavor — raisin — was introduced via an immersion circulator syrup, essentially a rapid infusion using a water bath. There were several other ways I could have introduced raisin flavor into the drink, including infusing booze, which might take days or even weeks, or making homemade bitters, which is fun but somewhat complicated and time consuming. Both of those methods, meanwhile, would have used alcohol bases that are more expensive than sugar+water. So I used a syrup because it was comparatively cheap and easy and fast to make.
If you want to make that apple-rosemary-honey-spice syrup, you could probably make it in an afternoon for less than the cost of a McDonald’s value meal. Syrups are thus both time- and cost-efficient, which is important when making drinks at home.
Making Syrups
Many recipes for making syrups, including some I’ve published in this newsletter, call for heating them on the stovetop. That can work, and I used that method more or less successfully for years.
But recently I’ve moved away from making syrups on the stove. Instead, I largely use two different methods: blending, for more basic syrups, and heating in an immersion circulator, for more complex flavor infusions.
Blending is a fast, efficient, and precise way to make syrups that merely require you to combine sugar and liquid. It’s better than making syrup on the stove because it’s quicker, and because you don’t lose any liquid from accidentally boiling off water.
So when I make rich (2:1) simple syrup, for example, all I do is combine two parts white sugar with one part water in a blender, let it blend on high for two or three minutes, and then bottle the result and stick it in the refrigerator to cool. For this syrup, typically I measure by weight, but volume measures will work if you don’t have a kitchen scale. You can make a basic 2:1 demerara syrup (without gum arabic) this way too.
Some syrups don’t even require a blender: You can make honey syrup by combining three parts honey with one part warm water, then whisking them together for about a minute. Sure, you could stick them in the blender, but this is even faster. Functionally, though, it’s the same approach: water+sweetener, mixed until integrated.
Immersion circulator (or sous vide) syrups take a bit more work, but the basic principle is still the same: Blend your liquid and sugar components together into a syrup, then heat the syrup plus the flavoring agent — raisins, for example, or cinnamon — for some number of hours in a sealed bag inside a water bath, then strain out any solids. This method effectively creates a rapid infusion, pulling the taste of the flavoring agent into the syrup. So you might, for example, have a demerara-raisin syrup that is essentially a demerara syrup infused with raisin flavor.
And because it all takes place in a sealed, airtight environment, there’s once again no liquid loss due to overheating. If I were going to make that apple-rosemary-honey-spice syrup, this is how I’d do it.
Immersion circulators can also help you integrate grainy, difficult-to-combine ingredients like gum arabic, which adds a subtle but significant thickness to any sugar syrup.
Commonly Used Syrups
Like I said, with a little creativity, you can make a syrup with practically any flavor or flavor combo you can imagine. But most of the time, you’ll end up working with a handful of staples. If you’re going to make drinks at home regularly, it’s useful to keep at least a couple in rotation.
I typically keep somewhere between three and six homemade syrups in my bar fridge at any given time. Most commonly:
Rich (2:1) simple syrup: a blended syrup made by blending two parts sugar with one part water at high speed for two or three minutes, then chilling. Great in Daiquiris and other shaken drinks, and can be used in Old Fashioneds if you need.
Demerara gum syrup: an immersion circulator syrup made by combining two parts demerara sugar, one part water, and a small amount of gum arabic, first in a blender, then in an immersion circulator. Great in Old Fashioned style drinks.
Honey syrup (3:1): a whisked syrup that’s surprisingly versatile. You can use it in a Bee’s Knees, a Gold Rush, or any number of Old Fashioned-style drinks, some of which we’ll cover in coming months.
Cinnamon syrup: an immersion circulator syrup that’s great for both tiki drinks and warm-and-fuzzy sweater-weather cocktails. Many recipes call for making this on the stovetop, but I much prefer a water bath/sous-vide method.
Ginger syrup: Made by juicing ginger roots and combining the juice with sugar. More on this below.
Cane syrup: Another blended syrup made by blending two parts organic cane sugar and one part water at high speed for 2-3 minutes. Cane syrup is sort of a middle ground between the light white sugar in ordinary simple syrup and the dark, heavy sugar in demerara syrups.
(I also often keep Grade B maple syrup and orgeat around, but both of these are store-bought and require no additional preparation.)
Notice something? I typically don’t keep 1:1 simple syrup on hand.
Now, ordinary simple syrup is quick and easy to make, so if I’m testing a recipe that specifically calls for it, I’ll whip up a batch. But for the most part, for drinks I already know and have made successfully before, I just use rich (2:1) simple syrup, slightly cutting the proportion if the drink comes across as too sweet.
Remember, the difference between the two syrups is relatively small: Ordinary simple syrup is 50 percent sugar, while rich simple syrup is 66 percent sugar. But rich simple is a little thicker, a little “fattier,” and I tend to prefer the way it changes the texture of a cocktail. Also, it’s just easier to keep one bottle around. Even with a dedicated bar fridge, I only have so much refrigerator space.
If you’re trying to figure out whether or not to keep one or both bottles around, the best way to decide is to make both, and then make classic Daiquiris with each.
A Modern Classic Scotch Sour
To help you think about syrups, let’s take a look at a drink that uses two different syrups: honey and ginger. It’s the Penicillin, a modern classic by bartender Sam Ross, derived directly from the Gold Rush cocktail we looked at several installments back.
The Gold Rush, if you recall, is just a Whiskey Sour made with honey syrup:
Gold Rush
¾ ounce 3:1 honey syrup
¾ ounce fresh lemon juice
2 ounces house bourbon
INSTRUCTIONS
Combine all ingredients in a shaker.
Add ice, then shake until thoroughly chilled.
Strain into a rocks glass over a single large piece of ice.
The Penicillin takes that structure and makes a handful of clever changes.
First, it uses a mellow blended scotch instead of bourbon for the base. Famous Grouse is my go-to bottle here, but lots of people quite like Monkey Shoulder as well. Both are mild, approachable, easy to combine with other ingredients, and easy to drink.
Second, it adds a sprayed mist of super-peaty, super-smoky Laphroaig 10 on top. Laphroaig 10 is a powerful Islay scotch of the sort that people tend to either love or hate. Personally, I love the stuff, and my first scotch experiences were all Islay bottles. But the mist here gives you the burnt-leaves campfire nose of the Laphroaig — while keeping the easy-drinking affability of the blended scotch base. (Also, this drink offers yet another reason why it’s useful to keep cheap, tiny spray bottles/misters around.)
Finally, and most importantly for today’s newsletter, it splits the syrup into two parts: the original honey syrup, and then a fresh ginger syrup. The total syrup volume remains the same as the Gold Rush, but now there’s an added flavor.
Occasionally you will see recipes that call for a combined honey-ginger syrup, made by heating ginger into honey. This can produce a very good Penicillin, but I strongly prefer a two-syrup method, in part because that’s how the drink was originally made, and in part because the two-syrup method leaves you with a standalone ginger syrup that is useful in other cocktails.
Plus, making ginger syrup is a fun project, since it requires you to juice ginger roots and combine that juice with sugar to make a syrup — which is what I want you to do to make this drink.
Let’s Make Ginger Syrup!
Remember how I said earlier that a syrup is just some liquid plus sugar? And how I said I’d mostly switched from making stovetop syrups to making blender syrups, because they were easier? This is a good illustration of both principles. (We’ll look at a novel immersion circulator syrup in a few weeks. Here’s a hint.)
Many recipes call for ginger (or honey-ginger) syrup to be made on the stovetop, by heating ginger juice and sugar (or honey and ginger root) together. But for the last year or two I’ve been making this using no added heat. Not only is this method faster and easier, it actually works better, because there’s no chance that any of the liquid will burn off during the heating process. That means it creates a more consistent syrup. It’s also faster.
To make this, you’ll need:
A bunch of ginger root
Several hundred grams of ordinary white sugar (the exact amount will depend on how much ginger root juice you extract)
A hefty knife for chopping the root
An electric blender
A chinois with a pestle, or similar fine mesh strainer
A kitchen scale
To make ginger syrup, start with a handful of ginger root. You don’t need a ton, but you need more than you think since you’re extracting a limited amount of juice from the root.

Some recipe guides will tell you to fully peel the roots with a vegetable peeler. For years, that’s how I made this syrup.
It’s a huge pain, and it turns out to be completely unnecessary. Instead, just chop the ginger into smallish pieces. It doesn’t matter too much how big, just so long as you have something small enough that your blender won’t choke.

Then stick them in your blender and blend on high for about 15-20 seconds. You should have a very rough quasi-paste that looks like this.

Before you start extracting juice, take your mixing bowl and zero it out on the kitchen scale.
Then place the bowl under your chinois, and scoop the rough paste into the strainer bowl. (If you don’t have a chinois, you can use cheesecloth or a fine-mesh strainer, although it’s a little more difficult.)
Then, use a pestle to push the ginger paste through the strainer into the mixing bowl. This will take a bit of strength and pressure, but you should extract a muddy brown juice. The juice should be a sort of mustard-yellow color. Continue until all the juice has been extracted.

Now weigh your fresh ginger juice in grams. (If you’ve already zeroed out your mixing bowl, the scale should tell you the weight of the juice only.)
Now that you know how much ginger juice you have, take that number and multiple it by 2. That’s how much sugar you need. So, for example, if you have exactly 100 grams of ginger juice, you need 200 grams of sugar. For a slightly spicier, less sweet syrup, multiply by 1.5.

In my case, I ended up with 114 grams of ginger juice. So I weighed out 228 grams of sugar.
Clean out your blender bowl. (Doesn’t need to be perfect, but you don’t want big hunks of ginger paste remaining.) Combine the sugar and the ginger juice in the blender, and blend them together for about two minutes on high. The result should be yellowish and perfectly consistent in color and thickness, with no clumps.
Bottle your syrup, date it, and store it in the refrigerator. It should keep for at least two weeks.

See what we’ve done? We took the juice from a root, added sugar, and made a 2:1 sugar:liquid syrup that tastes purely of ginger and sugar. This isn’t sugar water plus some other element; it’s just ginger-juice and sugar. The result is biting, kicky, and sharp. You should drop a bit on your finger and taste it on its own. I wouldn’t want to consume much of it own its own, but it makes incredible cocktails.
Speaking of, presuming you’ve also made honey syrup and juice some lemons, you’re ready to make this week’s drink:

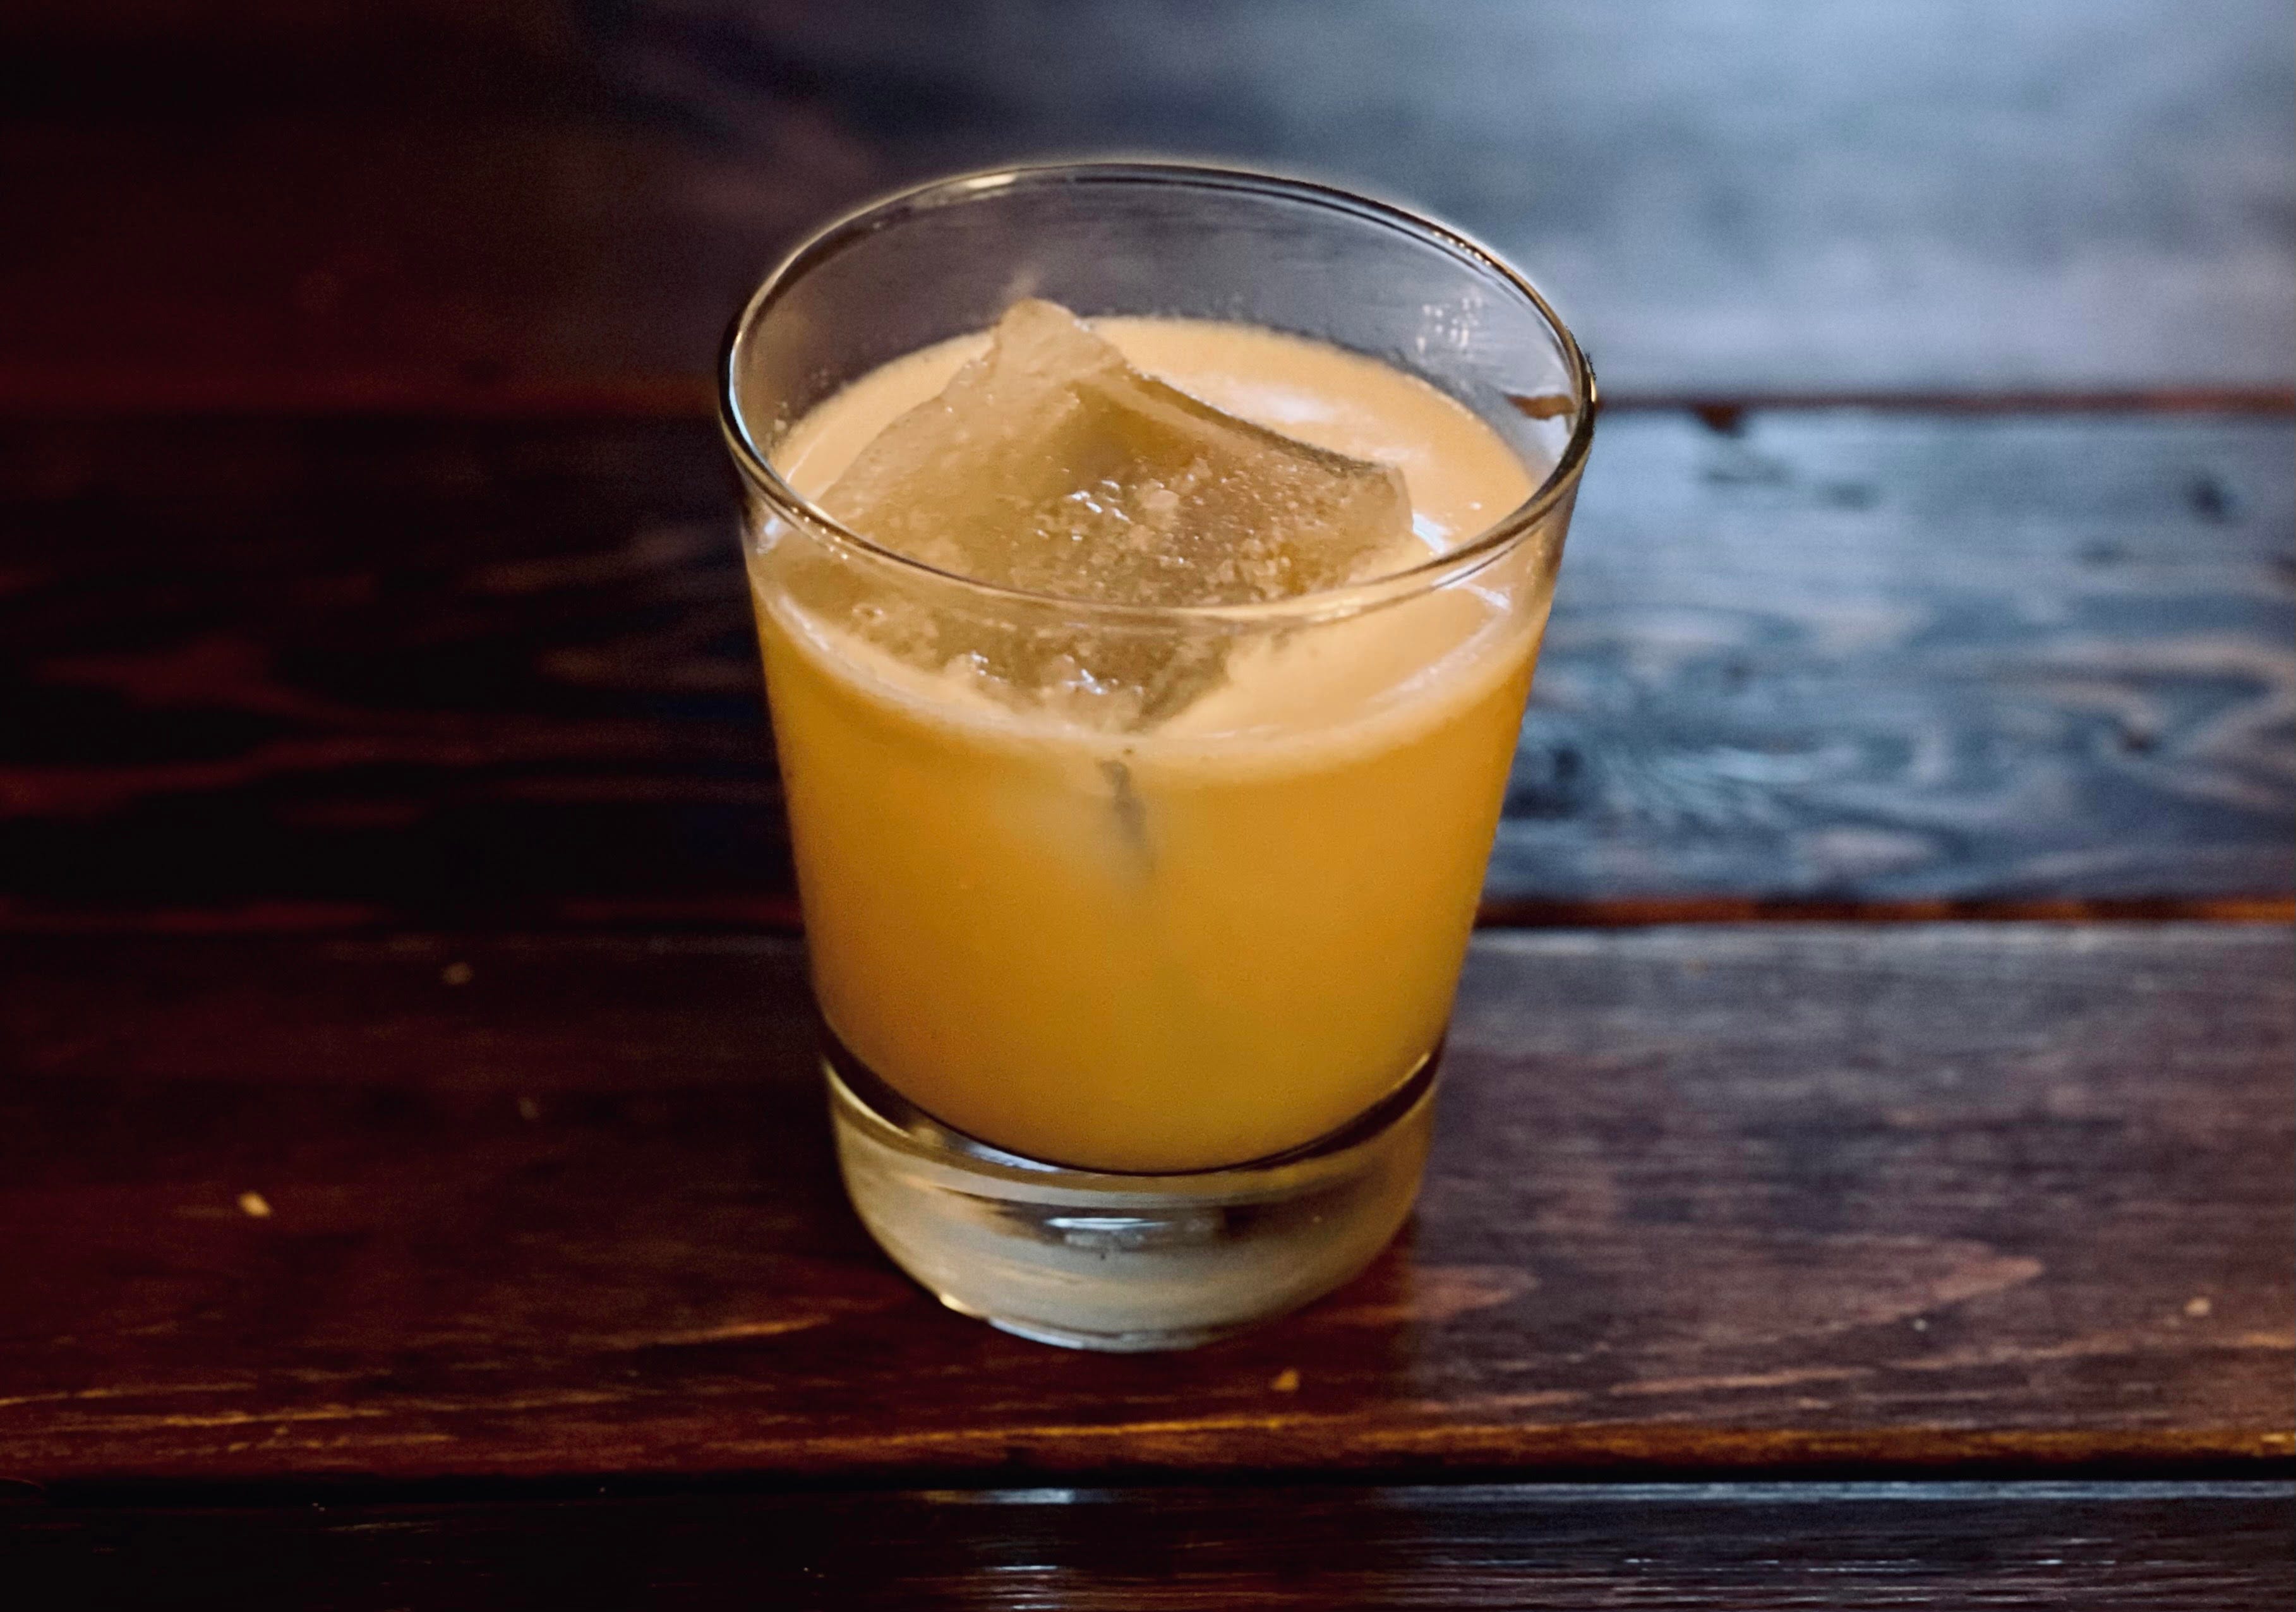
Penicillin
Mist-bottle of Laphroaig 10, to spray on top
⅜ ounce 3:1 honey syrup
⅜ ounce homemade ginger syrup
¾ ounce fresh lemon juice
2 ounces blended scotch (Famous Grouse, Monkey Shoulder)
INSTRUCTIONS
Combine all ingredients EXCEPT Laphroaig in a shaker.
Add ice, then shake until thoroughly chilled.
Strain into a rocks glass over a single large piece of ice.
Spray a mist of Laphroaig 10 on top. If you don’t have a mister, you can float 1 tsp on top of the drink by pouring it over the bowl of an upside down barspoon.
A couple of final notes: The easiest way to pour the ⅜ ounce syrup portions is to pour both into a ¾ ounce measure rather than trying to pour ⅜ ounce at a time. If you find the ginger heat overpowering, cut the ginger to ¼ ounce and boost the honey to ½ ounce.
If you don’t have Laphroaig 10, you can use most any Islay scotch. Ardbeg, Caol Ila, and Lagavulin all work reasonably well here. Since it’s a very small portion, you want something quite aggressively smoky and/or peaty. Try to avoid using more subtle bottles like Macallan or the Balvenie or Springbank, delicious as they may be.
As you can see, this is one of those drinks where it’s useful to have a bunch of cocktail accessories — in particular, squeeze and pour bottles of various sizes, as well as the spray mister for the Laphroaig. Those sorts of bottles aren’t particularly expensive, but they do take up space. If you’re going to keep a lot of homemade or home-modified ingredients around — juice, syrups, batches, infusions, etc. — it’s worth keeping some around.
***
(This newsletter relies on Amazon affiliate links, through which I may earn a small commission.)
I stumbled across a much easier way to juice the ginger. After you’ve blended it into small piece, dump it onto a cheesecloth. Wrap the cheesecloth around it until you have something like a tube of ginger. Then wring it out, like a towel, over a bowl. It works great! If you’re worried about accidentally having a couple of chunks drop out of your “towel” put a strainer over the bowl and wring the whole thing out above that.
This really gives me an excuse to take the sous vide out again since I rarely use mine for cooking anymore. On the cinnamon syrup, curious as to why you prefer the sous vide for it. Is it breaking down the bark better, different flavor?